Tuesday, July 31, 2018

Web-Services Best Practice : Using Parallel queueing to streamline Web-service data loads

Using Parallel queuing to streamline Web-service data loads

The key to moving data between applications that are in and out of the cloud is using web-service APIs.  This works great for individual transaction done in real-time, but what happens when you have a large batch of transactions to process, say 100000 transactions?   And 90% of the transactions take three seconds and the other 10% take an average of 45 seconds.   Well let’s do some math:
90000 transaction * 3 seconds = 270000 seconds = 4500 minutes = 75 hours
10000 transaction * 45 seconds = 450000 seconds = 7500 minutes = 125 hours
Total : 200 hours or 8.3 days.
As a data integrator, I worked at a healthcare provider, and as a team we found that this completely unacceptable.  The customer experience for processing EDI 834 Enrollment files for that project demanded a 24 hour turnaround time to printing enrollment cards.
However we knew that web-services are transaction independent.  Well pretty much.   An example, when processing these EDI 834 Enrollment files we needed to prioritize that the Subscribers are processed before dependents, but other than this, transactions could be processed in parallel within limits.   The limits for the HealthEdge system we were loading to seemed to have a threshold of about 75 parallel queues.   I have run into smaller thresholds in Oracle CX , Salesforce , and other cloud apps of 5 and 10 and 20.   Some of these queue limits may have come from the source side.   I was using SQL-Server Express, and it has a low threshold for open query sessions, while SQL-Server Enterprise is much larger.   We used SQL-Server to store messages to be processed.   This allowed us a lot of flexibility to be able to the queues, assign priorities based upon multiple criteria, such as message-type, or Subscriber/Dependent.   The database model is agnostic though, it will work in Oracle, MySQL, Postgres and well as the a fore mentioned SQL-Server.
The data model is quite simple.  Load data tables – these are tables where each column is a data value identified by the column header.  XML-Message views – These are views that translate the data into a single XML message per row from the Load data tables.  XML-Message tables take the generated message from the view and stores it in a Message request column, as well as having the URL to send the message to, and the credentials..
From here there are multiple ways to send the message and get its response and store it back into the original table.
So taking the above scenario applied to each threshold limit, please see the potential results below:
As you can see, the initial 200 hours was reduced to 2.7 hours when using 75 parallel queues.
The results of this strategy can be a critical approach for an organization to meet tactical objectives.
If you think this approach can help your company, please contact us to discuss your possibilities.

Related Content:

Tuesday, May 15, 2018

Actian DataConnect Breathes new life into Oracle CRM OnDemand Connector


Actian DataConnect Breathes new life into Oracle CRM OnDemand Connector


by David Byrd

Recently one of our customers ran into a problem with a particular connection to a custom object in Oracle CRM OnDemand.   This process had been in place since it was originally developed under the Pervasive Data Integrator name.   And after much analysis we determined it was a bug in the existing version the client had installed.  We installed a more current version that Actian provided, but that did not work.

I made a few product suggestions to my Actian support rep, and that was run up the chain of command to the Product manager who agreed these suggestions were worthy.    SO their engineering team got on with the changes and we recently started testing with them.

So maybe first it would be good to identify the issues I was running into when querying against a large custom object.

1.  The query would timeout when you hit Establish Connection.

2. The workaround for the query timeout was to set up a user that would only return records they owned ( this was normally a small set of records ).  This worked great unless you forget to set the macro back which would impact production.  

3.  The current map in the process which I rebuilt several times before Actian provided this latest version, would query for all records ( around 19000+) but only return 3000+.

So I waited patiently for Actian to provide an upgraded version.

They made their changes and provided a build for me.   They had now provided a timeout feature on the session screen.  


On the first try I built an new dataset, and it queried all 19000+ of the records.  Note that this took a long time... 20 plus minutes, but it did not timeout.


I thought-- awesome this works.    So I save and back out to the map.

However when I ran the map with the new dataset and retrieved the 3000+ records. 

So the error/bug was in the map!

So I went thru building the map, and using the dataset wizards to build it.  Upon building the new source, the Dataset builder it ran very quickly retrieving only 25 records and building out the schema.   The 25 records was surprising, and everything looked good, so using the map dataset wizard now build out the schema using just a sample of 25 records. 

I did set the timeout for 0 if that makes a difference.

I am going to reset to larger of 200 and see how that goes.
And that returned 25 too.   Interesting. 
So, the bottom line is if you click build new map and walk-through the wizards that walk you thru building a data-set, when you hit establish connection,
it works really quickly and returns 25 rows.... no matter what value you put in the timeout field.
I like this!
Once I had all the mappings completed in this new map, I ran it , and it retrieved all 19000+ records.   Yes - works.


Just some notes,  if you are in a newly created map and do change schema, and then create new dataset, when you hit establish connection,  it works really slow and returns all the  rows.... around 19000.   But the map still works.  The new changes definitely have some nuisances, but ultimately provide a much more enriched customer experience.


Friday, March 9, 2018

Reviews

Capterra
https://www.capterra.by/reviews/152298/dell-boomi

TrustRadius
https://www.trustradius.com/products/actian-dataconnect/reviews
https://www.trustradius.com/products/55d4b0d25c6c010e00a451a7/reviews
https://www.trustradius.com/products/55931b1f57e6291300b77ca4/reviews
https://www.trustradius.com/products/5061d969e1ff5d020000003a/reviews

G2Crowd
https://www.g2crowd.com/products/actian-dataconnect/reviews/actian-dataconnect-review-166019
https://www.g2crowd.com/products/oracle-content-marketing/reviews/oracle-content-marketing-review-538563
https://www.g2crowd.com/products/oracle-sales-cloud/reviews/oracle-sales-cloud-review-538629
https://www.g2crowd.com/products/microsoft-sql/reviews/microsoft-sql-review-538597
https://www.g2crowd.com/products/dell-boomi/reviews/dell-boomi-review-165908

Actian Integrations : Best Practice – Change Control Steps between Actian Server systems

Actian Integrations : Best Practice – Change Control Steps between Actian Server systems

Recently, I was reviewing a client’s Data Integrator server to deploy an approved package from there Staging to their production system.  I wanted to make sure that the full setup was documented as a Best Practice to be used with all our clients using Actian.
1.    On your Staging server, connect your Production Server as an Option for Deployment.
a.    First click on the Config tool ---  see pink arrow in picture below
b.    First hit the Plus Button ( see #1), then add the Url to the Server (#2) and the port (#3).
c.    Test the Connection and then Save.
2.    Now once you have a Deployed package to the Staging server that has been QA’d approved, you are ready to Deploy to Production.  So first click the Deploy button.
3.    Choose the Select Server radio button, and the appropriate Server from the pulldown Arrow.

4.    Next choose the package version to Deploy
5.    Then press the DEPLOY button.
The package is now deployed
Package Management
    Now we want to setup Integration Manager to be able to flip between Staging and Production Easily.  
The first thing we want to make sure of is that each server is named appropriately.  We can do this on the Admin Designer.  On the Settings Tab make sure the server name is descriptive.  In this case it is labelled as “Data Integrator Server – Staging”
Do this for each server.


Now that that is taken care of, we need to Log into Integration Manager in Staging First.   
Go to the Server Groups tab.
This tab is similar to the one above.  Make sure each server is listed and if not, press the Add button and fill out the Host Name and Port and then Test it.
Once all the servers are added.  Then you can go to  the Integrations tab.  From here you can choose the server you want to view.


Each user that uses Integration Manager has to do this, but it greatly improves the Customer Experience.

Actian DataConnect Best Practices: Clean up obsolete artifacts before you bring your server down!

Actian DataConnect Best Practices:  Clean up obsolete artifacts before you bring your server down!
by  David Byrd
Recently I had a server almost crash.  I quickly realized the disk space was extremely low.   I looked at the data directories, but the core data is stored on a data drive and not the system drive.   Please review the two best practices for data integrators below to see what you can do to prevent a system crash from no disk space left.

Best Practice # 1
Actian Integration processes can be deeply enriched by using the Logmessage function to record information about how you process is running.   This can be critical to have posted pertinent information just before a process crashes, potentially ruining a good customer experience..
That is the good side of having robust logging.   Unfortunately, the down side of robust logging is a large log file.   Actian’s integration manager does a good job of trying to manage small logs, however, when a log is generated that reaches too large a threshold, it will save it in the server local directory.  
The problem: There is no Cleanup of these logs.  
The solution:  Build a Bat file that delete all files in all sub directories like the following:
Note you will need to confirm the actual paths based on your installation.
Result:   Clearing these directories of old logs gave us back 45 GB.

Best Practice # 2
Actian Integration processes can be directly in the designer.  Everytime it runs this with a new configuration ( i.e. you made a change to the process ) the designer actually builds a DJAR file behind the scenes.   This is the same directory where the deployment djars are built too… so be careful.    All the djars built from the design have the word SNAPSHOT in it.   See picture below:
The problem: There is no Cleanup of these djars.  
The solution:  clear the SNAPSHOT Djars:
Note you will need to confirm the actual paths based on your installation.
Result:   Clearing these directories of old djars gave us back 4 GB.

Five ways you will benefit from StratusLite Quick Books Edition


QuickBooks to Oracle Sales Cloud
By David Byrd

Do you have a small business using Quickbooks?  Are you looking to make your sales team more efficient? Are you considering the use Oracle Sales Cloud (Oracle CX) and other Oracle applications to improve the customer experience? Do you want your data moved automatically from Quickbooks to Oracle Applications and back when required, but you do not have a data integrator on staff? No problem.
If you answered yes to any of those questions, you should consider using the SFCG Stratus-lite QuickBooks Integration edition. This article will help you understand the abilities of our integration and how it can help you.
One of the first things that the integration does is build Accounts and/or Contacts off of the Customer object within QuickBooks. The integration gives some limited options to control how this integration loads. For example, the first configurable option is the select statement for the customer object in QuickBooks.
The Select Statement is very similar to standard SQL. We use the “*” option to choose all columns of the data to be reported back. This part of the Select Statement is not configurable. However, the next part which is the “where clause” is. The where clause is the place in the SQL-like code that allows you to choose what conditions that you are querying.
The second Configurable piece is in the second step, the set Properties Step.
This step allows you to configure two options. One of the options is the customer name. This is used in the Integration Reporting.
The second option that is configurable in this step Load Orphans option. We give a firm the option of choosing whether to load all contacts, or just contacts that have accounts.
The mappings for accounts and the mappings for Contacts consist of:
Lastly, this process has the ability to report the good and bad responses from each message. It will combine these reports into a message which is sent via email. It will have a pre-configured dynamic subject line so it will not be grouped like some email systems do. It can be configured to use all notifications to be sent by: dc-notifications@sfcg.com. Notice the “To” option is david.byrd@sfcg.com. This could be anyone, or even a list.

So that about wraps up this offering. If you need more data brought over, speak with us to discuss an additional project for our Integration Services team.
Other Related Content :


Monday, November 20, 2017

Integration Computing Blog

An old Blog Post Site of Mine.

http://integrationcomputing.blogspot.com/

Enjoy!!

David Byrd

Wednesday, November 8, 2017

Powerhouse Integrations – Building Actian Integrations that work, so you don't have to!

Powerhouse Integrations – Building Actian Integrations that work, so you don't have to!

By David Byrd

Recently I wrote an article that was entitled, “Why Actian DataConnect Goes Head to Head with the Big Boys”.  I thought it might be beneficial to show a use-case for why this is important. But first my background. I was actually a customer of the original product when it was called Data Junction back in 1993 at Certified Vacations, and then in 1998 at Putnam Investments. The product did the job it was purchased for.

Then in 2003, I actually went to work for Data Junction when I moved back to Texas. Nine months later the company was purchased by Pervasive where I worked for another three years. Since then I have worked at many of their clients including QuickArrow/Netsuite, Toyota, ADP Total Source, Leprechaun, Deltek, Firstcare, Keta Group, Adaptive Planning (now Adaptive Insights) and finally SFCG. In the meantime, the company has been acquired yet again by another company called Actian.

As a developer and data integrator, there are many concepts that are important when designing a product. Some of these are Repeatable, Scalable, Stability, Reliability, Usability, and more. I have two great examples where Data Connect meets this mark.
The first was a project I started at Deltek for a client company called Keta Group. I built at first about 7 integrations that received that fed into Deltek Costpoint, or pulled data out of Costpoint and sent it outbound to a company using Maximus. Ultimately the requirements were reigned in, and it was decided to use five of the integrations I built. These were implemented in October 2008 and tweaked the next three months, and then very minors changes have been made since then. The great thing about these integrations is that they have been running consistently and reliably for over 6 years without any maintenance for Keta to require me ( or someone trained like me) to support them for that period. This speaks highly for the product in Stability.

Ralph Huybrechts, CFO of the Keta Group, LLC, had this to say, "We contracted with Deltek, the software supplier, who assigned David Byrd to write several Pervasive integrations between the prime and subcontractor’s accounting and timekeeping software and Maximo. David wrote, tested and finalized these integrations in a 45 day phase-in period prior to the start of our large base operations support contract with the Army. This contract requires 350 employees and handles 5,000 service orders per month. The integrations have performed flawlessly since the start of the contract in 2010. "

The second example I recently spoke about in another article called “Web-Services Best Practice: Using parallel queueing to streamline web-service data loads” and how it is important. When I was working at Firstcare I designed an integration that would run Accumulator Webservices messages, as well as others, that were stored in a database table. These messages were created by multiple integrations and fed into the table.   Here is the cool part – a single integration picks up these different types of messages and then sets the connection parameters on the fly from data stored in the table with the message like the URL endpoint, the user & password credentials and seamlessly processes the web service call and stores the response in the table for later processing.  That is this integration connects to multiple Web-Service endpoints without hardcoding the required parameters in the integration.  This speaks highly for the product in Scalability. In fact, Sandeep Kangala, former EDI Consultant at Firstcare, validated this process is still in effect for Accumulators and running without issue.

But it goes further, the same design concept was taken a step further at SFCG using Oracle CX endpoints. We initially built a similar integration to load Oracle Sales Cloud from data provided from exports from CRM on Demand.   However, even with this, we ran into some issues with CRM On Demand Attachments, especially large ones. The bulk export out of CRM OnDemand provide all the small file attachments, but not the large ones. It did though provide their Attachment ID, so we fed these ids into the database via CRM Attachment Export requests in bulk, and each attachment was stored in the database response. So in the case not only was data fed into a web service for loading but also to fetch data out of a web service, all through this single integration. The best part of this is that the integration does not care where the XML Message came from or is going to,  it just takes the message, connects, and sends it, and then stores the response. This is the height of Repeatability.

Chris Fuller-Wigg, Director of Sales Automated Services, stated, "The efficiency gains we experienced when loading data in parallel is kind of unreal, almost 10x faster than serial. We found ourselves losing a whole day for Accounts to load, only to push the button to load Contacts the following day. Cutting out the wait time and letting the system process multiple loads at once allows us to load data 1.5 weeks earlier on average."

Lawrence Chan, Sr Sales Automated Services Consultant, added, "The value of this solution is not only limited to the incredible improvements in data migration speed. With one click, we can have your system's data up to date the day before go live with one click of a button. With proper planning in place, those late nights getting your data up to date will be a thing of the past."

The fact the Actian DataConnect can be found to fulfill the meaning of these terms satisfies the ultimate customer experience. The customer here is two-fold, the first is the developer being able to define and build a trusted flexible integration, and the end-customer getting the data to work the way they want it. This is a win for Actian, a Win for the Developer and a win for the End-Customer.


Web-Services Best Practice: Using Parallel queueing to streamline Web-service data loads

Upgrading to DataConnect from Version 9 to Version 11 --- a better journey.

This was published on the Actian website :  https://www.actian.com/company/blog/upgrading-actian-dataconnect-version-9-version-11-better-journey/

Upgrading to Actian DataConnect 

from Version 9 to Version 11 

--- a better journey.    


I posted an article about a year ago speaking to upgrading from Data Integrator Version 9 to Version 10.  :    Actian DataConnect – The Conversion from v9 to v10 does not have to be scary!!
That article used the v9 or v10 Process object to use a script step to do the magic.  I actually provided code that could be used.
Well now there is the exciting new Actian Data Connect V11.
The first thing I did was look around within the tool.   It looks good, and some what intuitive, especially for previous v9 users.
The next thing I wanted to check out was the import tool.
So first thing I noticed was the file menu had an Import option:


Next it opens a wizard, and I choose to Import a Version 9 Workspace


Press Finish and it does the process to migrate.

Open the V11 workspace and choose what you want.


And I choose :


And it opened this:


And this was the original:


So that is the migration process from V9 to V11.  Much better customer experience than before.

Enjoy.

Coming soon details on migrating from V10 to V11.

Blog articles are Published at:  http://sfcg.com/author/david-byrd/
Other articles: Byrd's Integration Blogs


Check out my other articles :
Actian DataConnect - The Conversion from v9 to v10 does not have to be scary!!
Actian DataConnect Workaround - Working with GMAIL thru the Email Invoker in EZScript
Actian DataConnect Best Practices: Clean up obsolete artifacts before you bring your server down!
Actian DataConnect - Three Reasons Using Actian EZScript Code for sending Emails Should Be On Your Radar

Boomi Integrations: Smart Start for Boomi Extensions for Integrations Connections


Boomi Integrations: Extensions for Connections
by David Byrd

As a data integrator, you spent time putting your Boomi data integration together, and now it is time to move it from your Development environment, to a Test Environment, and then eventually move it into production.  This is how you connect to a On-Premise database, or the Cloud app like Oracle Sales Cloud/Oracle CX .
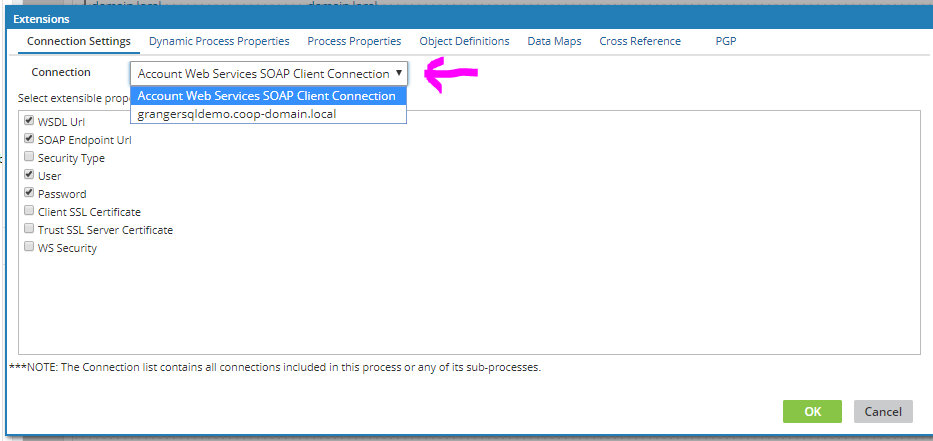
Step 1 : So the first thing to do is set up the Extensions for the connections.  In the Build tab, Open the process then click on the extension pop-up in the process.


You should now see a pop-up for the Extensions, like below:


Notice we are defaulted to the “Connection Settings” tab.  This article is focused on just the “Connections Settings”. 


Now if you click the pull-down for Connections, you all the connections available for this process.  Select one and it shows you all the settings you can modify at a later time.  If you want to be able to change the setting, make sure to check the checkbox in front of each setting that will be modifiable.
Now the Process is ready to deploy.  That will be covered in another article.

Step 2 : Set the extensions for the connections for the Environment, so click on the Manage tab.


Next choose your environment to set.


Then Click on Environment Extensions as shown below:


This opens a pop-up


Click on the Pull-down and choose the one of the Connections you want to setup the extensions.


You can then set each of the settings that you choose above, or check the “Use Default” to use the original setting setup in development.


As you can see the steps are easy and straight forward bringing the data integrator and nice customer experience.

And that does it.  Watch for new articles for the other types of Extensions used in a Boomi Process, and How to Deploy a process..

Blog articles are Published at:  http://sfcg.com/author/david-byrd/

Other articles: Byrd's Integration Blogs


Friday, March 10, 2017

Defining a Web-services Parallel processing Controller

The following presentation demonstrates a preferred solution I architected at a former Healthcare company.

The problem :   Too many webservices processing and connecting in an unorganized maner without any controls.   Multiple approaches  to loading efficiently caused the web-services API layer to become over-burdened.

The solution:   Build a webservices parallel load controller.

Please review video.

The last two screens defined costs using a real-time queue thru Data connect.

We did not do that.  Instead we used the SQL Server database to house a message controller, and then built processes in DataConnect executed by a stand-alone engine ( not Integration Manager).   Then windows task scheduler was used to run "X" number of loader jobs or queues.


XML Parsing IN SQL Server

COOL SQLServer code of the week
======================================


Hey Integration Fans....

Cool Code of the week.... so using Pervasive I was trying to parse an XML file like the Sample below. It had 125000 Request segments and was taking 45 minutes to process. I changed to delimited text source like I had done at FirstCare, and did my own parsing and that brought the time down by 10%.

The I tried the SQL code below to parse the XML inside of SQL SERVER... and that brought the parsing down to 125 seconds in 2 passes ( one for each request type). Note the savings was from 2700 seconds to 125, a reduction to 4.6% of the original time.

Enjoy this could be really helpful.

David


Sample XML showing schema....

<ETLWebServiceRequests>
<Request RequestType="CONSUMERTAG">
<assign-consumer-tag>
<tag-short-name>RpLexNex</tag-short-name>
<consumer-agency-identifier>1379376</consumer-agency-identifier>
</assign-consumer-tag>
</Request>
<Request RequestType="AREVENT">
<save-arevent-with-shortnames>
<consumer-agency-identifier>1601904</consumer-agency-identifier>
<action-code-shortname>CNSMSCR</action-code-shortname>
<result-code-shortname>SKPINFO</result-code-shortname>
<message-text>Received New score information from Skiptrace Lexis Nexis</message-text>
</save-arevent-with-shortnames>
</Request>
</ETLWebServiceRequests>


And here is the SQL:
----------------------------------

DECLARE @XML XML;
SELECT @XML = CAST((SELECT * FROM OPENROWSET (BULK '\\wasvpdb005\FileImport\LN_PostProcess\LN_Tag.xml' , SINGLE_BLOB) AS x) AS XML);
SELECT RequestNodes,
CAST( RequestNodes AS NVARCHAR(4000)) RequestNodeTxt,
(
SELECT T.c.value('.','varchar(8)')
FROM RequestNodes.nodes('/assign-consumer-tag/tag-short-name[1]') T(c)
) tag_short_name,
(
SELECT T.c.value('.','int')
FROM RequestNodes.nodes('/assign-consumer-tag/consumer-agency-identifier[1]') T(c)
) consumer_agency_identifier
FROM
(
SELECT T.c.query('.') AS RequestNodes
--, T.c.value('../@RequestType','varchar(50)') AS result
FROM @XML.nodes('/ETLWebServiceRequests/Request/*') T(c)
) RequestNodes

SELECT RequestNodes,
CAST( RequestNodes AS NVARCHAR(4000)) RequestNodeTxt,
(
SELECT T.c.value('.','varchar(8)')
FROM RequestNodes.nodes('/save-arevent-with-shortnames/action-code-shortname[1]') T(c)
) action_code_shortname,
(
SELECT T.c.value('.','varchar(8)')
FROM RequestNodes.nodes('/save-arevent-with-shortnames/message-text[1]') T(c)
) message_text,
(
SELECT T.c.value('.','varchar(8)')
FROM RequestNodes.nodes('/save-arevent-with-shortnames/action-code-shortname[1]') T(c)
) action_code_shortname,
(
SELECT T.c.value('.','int')
FROM RequestNodes.nodes('/save-arevent-with-shortnames/consumer-agency-identifier[1]') T(c)
) consumer_agency_identifier
FROM
(
SELECT T.c.query('.') AS RequestNodes
--, T.c.value('../@RequestType','varchar(50)') AS result
FROM @XML.nodes('/ETLWebServiceRequests/Request/*') T(c)
) RequestNodes
 collapse

Submitting a stored Proc Asynchronously


COOL CODE of the week :
    Careful how you use this.   It is powerful and allows you to start a stored proc(2) within a stored proc(1), and conitnue on in the calling proc(1) even while the called proc(2) is still running.   I am thinking you could build one master stored proc to run the Atlas Queues.     Note:   the very bottom of the calling proc(1)  should have a monitoring piece that watches for the status of the Queued procs to be completed ( and yes the called proc(2) would have to write to a table to say it was done.    When all this occurs, then the calling proc(1) can finish.        

http://www.databasejournal.com/features/mssql/article.php/3427581/Submitting-AStored-Procedure-Asynchronously.htm


Using Webservices in Other Databases

And the Oracle Cloud Equivalent : https://cloud.oracle.com/database

And MYSQL : http://open-bi.blogspot.com/2012/11/call-restful-web-services-from-mysql.html

USING SQL to work with WEBSERVICES in SQL Server

COOL SQLServer code of the week - Part 2
USING SQL to work with WEBSERVICES in SQL Server
======================================
Note: the webservice in this does not give a response back.  Not sure what is wrong with the SQL

Hey Integration Fans....


Below is some pretty powerful code that let’s you execute a call to a web-service from SQL-Server directly.

[dbo].[usp_HTTPRequest] - This stored proc makes the connection to the webservice. It should be enhanced probably to handle retry’s/Timeouts/XL Messages and such. 

The parameters on the execution of this proc allow you to put in the URL where the xml message is being sent, the actual xml message, and the other potentially required information such as methodName , SoapAction , UserName, and Password


David 

CODE:
======================================

USE [Work]
GO
/****** Object: StoredProcedure [dbo].[usp_HTTPRequest] Script Date: 8/14/2014 9:48:17 AM ******/
SET ANSI_NULLS ON
GO
SET QUOTED_IDENTIFIER ON
GO

ALTER proc [dbo].[usp_HTTPRequest] (
@URI varchar(2000) = '', 
@methodName varchar(50) = '',
@requestBody varchar(8000) = '',
@SoapAction varchar(255),
@UserName nvarchar(100), -- Domain\UserName or UserName
@Password nvarchar(100),
@responseText varchar(8000) output )
as
SET NOCOUNT ON
IF @methodName = ''
BEGIN
select FailPoint = 'Method Name must be set'
return
END
set @responseText = 'FAILED'
DECLARE @objectID int
DECLARE @hResult int
DECLARE @source varchar(255), @desc varchar(255)
EXEC @hResult = sp_OACreate 'MSXML2.ServerXMLHTTP', @objectID OUT
IF @hResult <> 0
BEGIN
EXEC sp_OAGetErrorInfo @objectID, @source OUT, @desc OUT
SELECT hResult = convert(varbinary(4), @hResult),
source = @source,
description = @desc,
FailPoint = 'Create failed',
MedthodName = @methodName
goto destroy
return
END
-- open the destination URI with Specified method
EXEC @hResult = sp_OAMethod @objectID, 'open', null, @methodName, @URI, 'false', @UserName, @Password
IF @hResult <> 0
BEGIN
EXEC sp_OAGetErrorInfo @objectID, @source OUT, @desc OUT
SELECT hResult = convert(varbinary(4), @hResult),
source = @source,
description = @desc,
FailPoint = 'Open failed',
MedthodName = @methodName
goto destroy
return
END
-- set request headers
EXEC @hResult = sp_OAMethod @objectID, 'setRequestHeader', null, 'Content-Type', 'text/xml;charset=UTF-8'
IF @hResult <> 0
BEGIN
EXEC sp_OAGetErrorInfo @objectID, @source OUT, @desc OUT
SELECT hResult = convert(varbinary(4), @hResult),
source = @source,
description = @desc,
FailPoint = 'SetRequestHeader failed',
MedthodName = @methodName
goto destroy
return
END
-- set soap action
EXEC @hResult = sp_OAMethod @objectID, 'setRequestHeader', null, 'SOAPAction', @SoapAction
IF @hResult <> 0
BEGIN
EXEC sp_OAGetErrorInfo @objectID, @source OUT, @desc OUT
SELECT hResult = convert(varbinary(4), @hResult),
source = @source,
description = @desc,
FailPoint = 'SetRequestHeader failed',
MedthodName = @methodName
goto destroy
return
END
declare @len int
set @len = len(@requestBody)
EXEC @hResult = sp_OAMethod @objectID, 'setRequestHeader', null, 'Content-Length', @len
IF @hResult <> 0
BEGIN
EXEC sp_OAGetErrorInfo @objectID, @source OUT, @desc OUT
SELECT hResult = convert(varbinary(4), @hResult),
source = @source,
description = @desc,
FailPoint = 'SetRequestHeader failed',
MedthodName = @methodName
goto destroy
return
END
/*
-- if you have headers in a table called RequestHeader you can go through them with this
DECLARE @HeaderKey varchar(500), @HeaderValue varchar(500)
DECLARE RequestHeader CURSOR
LOCAL FAST_FORWARD
FOR
SELECT HeaderKey, HeaderValue
FROM RequestHeaders
WHERE Method = @methodName
OPEN RequestHeader
FETCH NEXT FROM RequestHeader
INTO @HeaderKey, @HeaderValue
WHILE @@FETCH_STATUS = 0
BEGIN
--select @HeaderKey, @HeaderValue, @methodName
EXEC @hResult = sp_OAMethod @objectID, 'setRequestHeader', null, @HeaderKey, @HeaderValue
IF @hResult <> 0
BEGIN
EXEC sp_OAGetErrorInfo @objectID, @source OUT, @desc OUT
SELECT hResult = convert(varbinary(4), @hResult),
source = @source,
description = @desc,
FailPoint = 'SetRequestHeader failed',
MedthodName = @methodName
goto destroy
return
END
FETCH NEXT FROM RequestHeader
INTO @HeaderKey, @HeaderValue
END
CLOSE RequestHeader
DEALLOCATE RequestHeader
*/
-- send the request
EXEC @hResult = sp_OAMethod @objectID, 'send', null, @requestBody
IF @hResult <> 0
BEGIN
EXEC sp_OAGetErrorInfo @objectID, @source OUT, @desc OUT
SELECT hResult = convert(varbinary(4), @hResult),
source = @source,
description = @desc,
FailPoint = 'Send failed',
MedthodName = @methodName
goto destroy
return
END
declare @statusText varchar(1000), @status varchar(1000)
-- Get status text
exec sp_OAGetProperty @objectID, 'StatusText', @statusText out
exec sp_OAGetProperty @objectID, 'Status', @status out
select @status, @statusText, @methodName
-- Get response text
exec sp_OAGetProperty @objectID, 'responseText', @responseText out
IF @hResult <> 0
BEGIN
EXEC sp_OAGetErrorInfo @objectID, @source OUT, @desc OUT
SELECT hResult = convert(varbinary(4), @hResult),
source = @source,
description = @desc,
FailPoint = 'ResponseText failed',
MedthodName = @methodName
goto destroy
return
END
destroy:
exec sp_OADestroy @objectID
SET NOCOUNT OFF